Lingerie and Jewelry Chest (March 2008)
|
|
Interested in building one of these yourself for
someone special? You can find the plans here:
|
This was a special project that was a gift for my Mom for her 70th birthday.
I started the project on January 30th (See the chronological history of the
project below). Her birthday was March 19th, which didn't leave me much time
for completing the project.
I built this chest from some black walnut stock that my Dad had rough cut over
25 years ago. Finished it with Danish Oil and wipe on poly as I do all my walnut
projects.
Below you will find the gory details of my first major build. I enjoyed this
project and learned quite few new techniques in the process. I hope you enjoy
the reading.
The Project History
01/30-2008 - The Project begins !I ordered the plans for the chest today. They wont be here until next week.
02/03/2008 - Road TripNancy and I headed up to my brother's place in CT today to pick up some of the walnut. We had a nice visit with Andy and Penny and then headed back home to watch the Giants win the Superbowl ! Finding a place to store the walnut wasn't easy. I had to clear an area of the workshop to make room to stack it.
02/06/2008 - The Plan arrivesThe plan for the chest arrived today (along with some Forstner drill bits and a pipe clamp). The plan was on a large sheet of paper, printed on both sides. I was expecting a little bit more ... but I think there's enough information here to get the job done. The original plan called for using a 4x8 sheet of Mahogany plywood, and about 10 board feet of Mahogany stock. I'm going to try and not use much plywood if I can. Also, the joinery used in the plan is basically butt joints secured with glue and finishing nails ... I'll be making some changes to the plan to use some nicer joinery techniques and not have any visible nails.
I've also decided to build the complete chest out of MDF for two reasons. First, it will give me some practice in cutting and assembling the chest using the MDF before starting to cut the walnut. Second, it will make a nice cabinet for the workshop ! 02/10/2008 - Milling the Rough Cut Lumber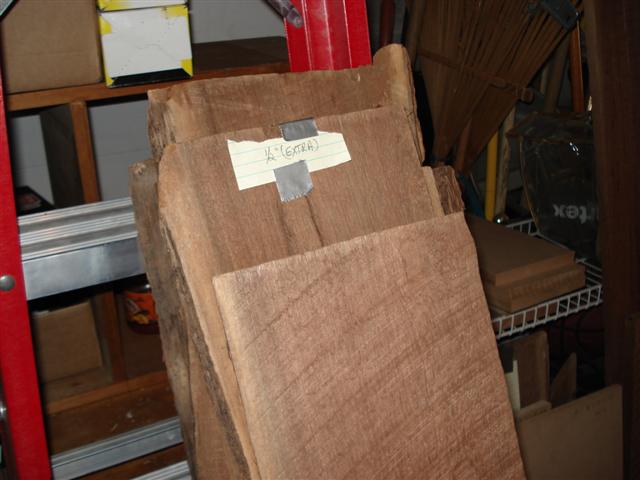 Before I could use the walnut, I needed to pick out what I was going to be using for the project and plane that down to 3/4 and 2/4 thickness. I don't own a thickness planer, but a friend at work (Carl) offered to help me out. I spent the afternoon today at Carl's home workshop where he helped me tremendously getting this wood ready to use. He also showed me quite a few tips including how to use Danish oil to bring out the color and grain pattern from this walnut. Thanks Carl !
Here's a shot of the rough cut lumber prior to heading over to Carl's shop.
02/10-15/2008 -Building the Prototype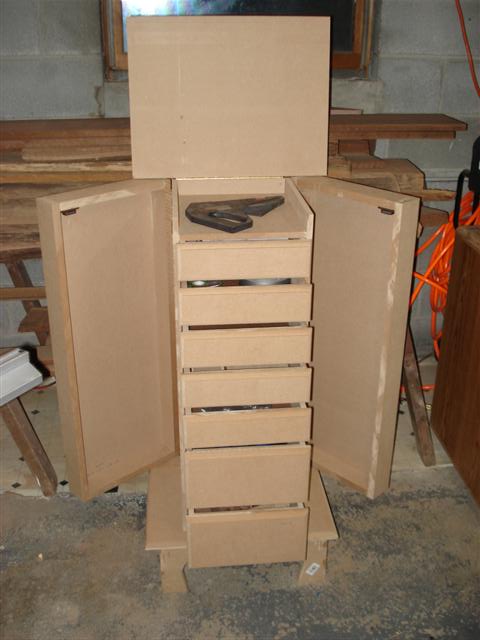
This week was spent building the prototype out of MDF. This chest will make a nice addition to the workshop. I still have to complete the door fronts
f
or the drawers. The plan calls for just gluing and nailing the drawer fronts to the drawers, but I'd like to find a way to make them adjustable. When I finish the drawer fronts I'll append a picture.Here's a picture of the finished prototype,
02/16/2008 - Building the ChestI officially started building the actual chest today. I've got about one month to complete it.
This weekend I worked on creating the drawer dividers. There are eight dividers in the chest made of 1/2" plywood with edge banding for the front edge. The plan called for a 3/4" edging, but I decided on using a 2" edging instead so that I could use the same edge parts for the drawer dividers and the back and front piece edging. The plan also called for using finishing nails and glue to attach the edging. I decided to use a tongue and groove joint instead (I don't own a biscuit jointer yet) so that I didn't need to use nails to attach the edging. Using the table saw I created a 5/32" x 1/4" tongue on each walnut piece and a corresponding groove on the plywood. To keep the plywood square on the table saw as I was making the cuts I also needed to make a tall auxiliary fence to support the piece.
I started to create the sides (wings) for the chest this weekend also. The sides are approximately 32" x 12" which is wider than any of the boards that I have available, so I needed to take two boards and edge glue them together to form a board of the required width. Both sides and the top and bottom of the chest all require to piece together two or more lengths to reach the required width. For each of these the two panels that will be used were cut from the same 2" thick rough cut walnut plank so that I could try and match the grain pattern easier.
02/27/2008 - Still BuildingI've been too busy trying to get this done in time for Mom's birthday so I haven't had a chance to do many updates to the web page. Things are progressing, but we are about to enter crunch time.
Most of the walnut has been cut to size and I've assembled and routered the decorative base.
I've been experimenting with creating dovetail joints to use on the drawers. They are time consuming and tricky to get right but I think it will add a nice touch. I should begin the assembly of the carcase by the weekend .... Stay tuned.
03/06/2008 - Carcase is assembledI finished assembling the carcase today. I used a biscuit jointer to create the joints between the drawer bottoms and the sides and back panel. The walnut banding on the sides and the back panel was also joined with biscuits. To assemble the sides, back, and drawer dividers I used 50 biscuits! That's 100 biscuit slots that needed to be cut exactly ! I assembled it in three stages. First the left side, back panel and top and bottom dividers making sure that this assembly was perfectly square and true. I let that dry overnight and then added all the drawer dividers next and dry fitted the right side to help support the drawer dividers. Lastly I glued the right side of the carcase to complete the assembly.
On to the wings next !
3/22/2008 (1:00 AM) - The project is done !I got about 10 hours sleep in the last three days, but the project is done, and just in time for Mom's birthday celebration at my Sister's house today.
Some facts and more photos ....- I used black walnut thickness planed to just under 3/4" for most of the pats, 2/4" for the banding on the drawer dividers and the back and front panel.
- The carcase and drawer dividers are 1/2" birch plywood.
- The drawers are made from 1/2" Aspen.
- I lined the top compartment, two drawers, the inside of the wings and the outside of the carcase sides with burgundy velvet.
- One of the lined drawers also has removal dividers within the drawer. All drawers are also dovetailed.
- I used two coats of danish oil on the walnut, and sealed it with 3 coats of wipe on poly.
- For the drawers I used two coats of ARM-R-Seal.
Here's a slideshow with some shots taken during the construction for those of you that have made it this far :-). Thanks for reading.
|


